Saturday, December 20, 2008

Merry Christmas!

Sheng Dan Kuai Le!


A 2nd grade Illuminated Manuscript project involving illustration, adornment, and some technology (font type, size, bold, italics, etc.). They chose the song excerpts from a list of six different Christmas texts. The storybook capital letter and border were areas they used pictures to explain the text. We also used the computer lab to explore the visual design aspects of word processing.


Click on the images to make them larger!

The brown row on the top of this border is Santa's sleigh with all the reindeer and their silver bells!

Thursday, December 18, 2008

Why does Miss M need a fireplace?


Ok, I'll give away the correct answer in the beginning. It's for the lower elementary (PreK-2nd) Christmas program. The setting is a living room...kids in pajamas, listening to a bedtime story. Clearly, a fireplace would help set the stage.

The fireplace was constructed last week (through our facilities department), but with the upper elementary (3rd-5th) Christmas program last Friday, I had NO TIME to paint the wooden structure.

Suddenly, it was this week, and we needed the fireplace ready for 10:30 am, Wednesday.

I managed to get a beige basecoat completed on Monday. That left the stones for Tuesday.

Tuesday is also my heavy load for teaching. I threw the dress code out the window and wore painting clothes all day long. Between classes, and even during classes, I painted! The typical routine: explain to the students why I have the fireplace and why I need to work on it, start them on their project, and then get back to painting! Some second graders finished their project early and wanted to help. The inside black and top brown are complements of that class!

My last class of the day was 1st grade. I wasn't finished with the stone, but I knew I could not paint during that class. Those kids demand my whole attention!

Retelling the story later, I described the fireplace as the elephant in the room. That's completely the wrong phrase. Sure, it's the big thing in the middle of the room, but EVERYONE is talking about it!

I got first grade seated and quiet as quickly as possible. It was time to start the spiel. Raise your hand if you can tell me what that it? Since most of my kids are non-native English speakers, they don't know the English word "fireplace." Instead, I get the word fire, accompanied by hand motions and sound effects! Yes, in English, we call that a fireplace.

and WHY does Miss M need a fireplace?

The most popular answer was "to be warm." It may be cold in our school, but this fake wooden fireplace is not a solution to that problem!

Answer number two, from Justin, the creator of the pilgrim snowmen below, "so Santa can come and bring you presents!"

As every first grader knows, I live in my classroom. And how is Santa going to find me all the way around the world in China? Clearly, I need a fireplace. It made perfect sense to him! (Never mind the fundamental structural differences between this faux fireplace and the real-deal, namely a chimney!)


Sitting on the ground, doing some finishing touch-ups!

Wednesday, December 17, 2008

Snow Family

To say my mom likes Snowmen would be an understatement.

Christmas decoration in my house consist of LOTS of snowmen. The best part about the snowmen collection, was, even though the tree and nativity get put away in January, the Snowmen sometimes make it all the way into February! Recently, Momma Mel has been getting restless and started packing them up sometime in January, but there's still hope...


I decided to do some snowmen projects with my students. I didn't quite get all our fall-themed projects finished in time for appropriate display around school. At least if these projects were Winter, and not specific to Christmas, they could be displayed in January and February!

I found this book in the library called Snow Family. Not a classic, but it's cute and rhyming! Who doesn't love a rhyming book? So fun to read aloud!

The concept is that this little boy's parents take care of him, tie his scarf, kiss his cheek, and put him to bed at night. Yet all the Snow Kids have no parents to take care of them! They run around the fields, laughing and playing, but lose a mitten here, a boot there...

After running around the woods with the Snow Kids, the boy decides he needs to make them a Snow Mom and Dad to take care of the Snow Kids!


We read the book one week and then started the drawings. A small part of our last project was with oil pastel, so this drawing continued their exploration of the medium. The last project was on white paper, emphasizing the oil/water resist possibilities with oil pastel and watercolor. This time, we focused on their opacity---being able to color white, yellow, pink on DARK BLUE PAPER! Working with oil pastels is like doing a magic trick with crayons to these kids!

I told the first graders they were to draw their whole family as snowpeople. Moms, dads, brothers, sisters, grandparents, pets. Anyone in their family!

How would we be able to tell who was the Mom and who was the Dad? What they're wearing, what size they are, and some of the kids took it upon themselves to label their snowpeople...

This week was their second and final day of the project. Just a quick exploration of symbolism and oil pastels. Here are some of the results!


I like to call this one The Pilgrim Snowmen. Especially before he colored the hats in with light blue, these snowmen looked like they were ready for a Thanksgiving feast! It's hard to tell, but the guy on the right has a gold buckle on his hat! This boy's family is actually 5 people. Notice the two smaller snowmen in the background. Dad's the one wearing a Santa hat, and does the guy in the middle have a sheriff's badge?


These snowmen are "country folk." A little cowboy hat and vest? Mom's wearing a sweet straw hat with a flower attached. The cloud of action on the right represents the three siblings. "We're fighting" she told me. Notice how she labeled the boys with their names and a blue heart, and the girls with pink names and hearts!


To continue the trend of fighting, this girl told me her mommy and daddy were on one team, she was on the other, and they were throwing snowballs at each other! To be fair, there was a snowball fight in the book. Look at her mom's eyelashes! I told her I can tell how beautiful her mom is because of her pretty eyes!


Here's your last snow family picture. This is actually a stop-action movie, all on one page. Early animation! The first thing he animated was the sun. It's actually just one sun, he told me, not three. The arrows show how it moves across the sky. The green under the white along the bottom of the page is the grass, as the sun melts the snow. Then he added an arrow from his snowman into the house. He told me he was only dressed up as a snowman, then he took off his costume and walked up the stairs. The last bit of animation---the fireplace with the smoke going up and out the chimney!

from my kindergarten ARTIST

A new painting from Rachel ("Miss M., can you tell I'm an artist?)

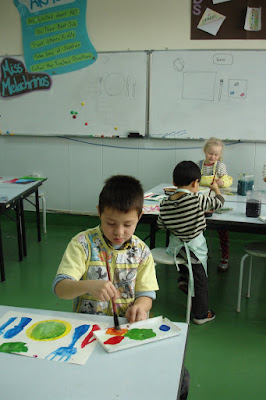
Kindergarten started class by attempting to mix 8 colors for me and paint them on a worksheet (on top of the printed name). Red, yellow, blue, orange, purple, green, pink, brown. Here was the kicker, they only had red, yellow, blue, and white!

Unlike the 1st grade painting sessions, we spent less time explicitly stating the mixing combos. Instead, I wanted to see how much they'd figured out on their own. Kids were allowed to tell each other what to mix, but each student had to mix their own colors. Some were more successful that others. After they found all 8 colors, they could move onto their painting.

Most students finished early, and since my paper stash was SUPER LOW, I didn't have extra papers for another painting. Instead, they cleaned up as they finished, and when a group was ready, I read a picture book called Snow Family for the last ten minutes of class. (Look for a post SOON about the first grade projects that go with that book.)

My artist was unfazed, even as EVERY OTHER KID in her class was finished, washed up, and listening to the book. Her back was to me as I read, and I never saw her turn to check out what was going on. Rachel was focused on that painting. Finally, with less than two minutes remaining, I told her it was time for her to stop and wash her hands. She said a simple "ok" and went to the sink!

I asked her about her painting. It's quite different from her "corners" piece (picture below). She didn't really have a story about it. I think she was simply caught up in mixing colors and painting them in beautiful patches across her paper. My little abstract expressionist!

Saturday, November 22, 2008

Funny Moments

I was trying to decide today which class is my favorite. I can't decide. I'm like the mom that says "all of you are my favorite" or "I don't have a favorite."

I was also thinking about funny moments this year. A few teachers were talking about those moments when you just crack up in class and can't stop laughing. I have a lot of fun in art class, but not so many moments of huge laughter, so much that it disturbs class.

I did have one really fun class when I totally lost my composure. 4th grade had come for class. The music classes nearby and cafeteria were a little loud. I knew I wanted to talk for a while at the beginning of class, so I decided I should close the door to block the noise. All the students were sitting, and instead of asking someone to close the door, I walked over to do it myself. As I got close to the door, I started turning towards the class and closing the door at the same time. The door opens into my room, so I was pushing it closed away from me. Turns out, not all the students were in the room. For some reason, one boy was straggling behind. I closed the door on Steven's face. My only clue was the loud clunk and the burst of laughter from my students. Since I had been addressing them as I went to close the door, they were all looking at me and saw me shut the door in his face!

Startled, I opened the door to see what had happened. I had knocked him onto his butt, and he was sitting on the floor, quite confused and startled himself! Thankfully, Steven has a sense of humor. I asked if he was okay and gave him a hand to help him get on his feet again. Meanwhile, the class was roaring with laughter. Even as I tried to start the lesson again, I started laughing more. It was just one of those moments!


The other classes that ALWAYS cause me to laugh are PreK and Kindergarten. The kids say and draw the funniest things!

For example, take this little girl named Rachel. She's in kindergarten. This picture is from the first week of painting. She told me "Miss M, I'm an artist. You know how you can tell, see how I paint the corners! I could paint all day. I could paint for a whole hour!" She was so excited to be painting!


I also got a kick out of William's painting. At the beginning of class, I explained to the kindergarteners what they need to be ready to paint. I compared it to a place setting for a Western meal. We looked at a drawing on the board of a plate, cup, napkin, knife, fork, and spoon. We mentioned how we would need different things to eat Chinese, like chopsticks. All those things make us ready to eat our food.

Next to the place setting, I drew their painting set-up. We compared the picture to what they had at their seat. I explained each item--their paper, paintbrush, water cup, paint palette, and spongebob (I don't think I've explained spongebob yet...for another post). Then it was time to paint!

As I walked around the class, I realized William was inspired by my place setting picture. Check out his painting! And if you look above him to the white board, you can see my place setting on the left and painting set-up on the right!

Friday, November 21, 2008

Awesome Autumn Art

When I started thinking about my elementary art curriculum, I decided I wanted to do eight types of art projects each year with my students. Structuring the program this way, I would expose the students to many types of art, and build on their knowledge each year. Ideally, we would do two types of art each marking quarter.

In the book The Art of Teaching Art to Children, the author has five or six categories. I started with this list, but adapted it to my leanings. My eight:

Drawing
Painting
Printmaking
Collage
Sculpture
Ceramics
Weaving/Fibers
Design (product design, graphic design, architecture)

I don't know how successful I will be at touching all eight categories in each grade. Check back in June for that update.

2nd grade recently finished a printmaking project. I took Intro to Printmaking in college for my multiples requirement. Unfortunately, we did mostly intaglio printmaking--etching, aquatint, etc. I did entirely intaglio projects. Metal, acid, large printing presses. Not exactly appropriate for 7 and 8 year olds.

Our professor did introduce collagraph as an optional technique. I never tried it, but my roommate was a big fan of collagraphs. My other small taste of collagraphs was a lesson I observed while student teaching in the UK. The teacher made collagraphs with his 11th graders.

I decided to do collagraphs with the 2nd graders. The Art of Teaching Art to Children gave me good ideas about how to adapt this process for young children.

I wasn't sure what I wanted the students to make collagraphs of...what was the subject? I just knew I wanted them to explore collagraphs as a type of printmaking.

I wrestled with the subject matter for a while. I hate arbitrarily deciding subject matter. I really want my art projects to be an extention of learning in the classroom. Why should I draw ocean creatures with 4th grade if 3rd grade does a science unit on the ocean? I tried to find out more about the 2nd grade curriculum. They were about to start a science unit on solids, liquids, and gasses. I couldn't figure out how to tie that into collagraphs. The social studies unit--autumn and thanksgiving.

I wasn't very inspired. Eventually, it was the day to start the collagraphs and I still didn't have a subject matter for the project! Sometimes, all it takes is a little pressure. I don't know why I didn't think of it earlier, but autumn leaves! We could make collagraphs of leaves. The students could look at different types of leaves and draw one large leaf on their matboard "plate." Then, using string, cardboard, window screening, and fabric, students could define their leaf.

If I could do the lesson again, I would get real leaves for them to draw. Not having any trees that actually belong to me, I was nervous to begin snatching leaves from trees around China. In China, even without posted signs, everyone knows not to walk on the grass. Grass is for looking at, not walking or sitting on. I wasn't sure about the philosophy towards trees and their leaves, but I didn't want to test it. Even the trees on our school campus weren't up for picking. We rent our space from another school, and I think the tree leaves are probably not part of the rental agreement.

Instead of real leaves, I printed out photos of leaves from the internet. Students drew their leaf and started the collagraph fun! I suggested they use string to define the outside of leaf and the veins. Another material would be perfect for filling the background.

Some students picked up on defining shape through textures (or lack thereof). Other students could not think through the process and wanted to use green materials for their leaf.

After two classes, the plates were a collage of materials! My TA used some type of furniture varnish to seal the plates.

The printing day arrived! We didn't have printing ink, so I decided to mix up tempera paint in four autumn hues: deep red, rusty orange, mustard yellow, and brown.

I didn't test my plate first, but went right into the demonstration in front of the students. Ooops! Turns out brayers and tempera paint are a BAD combination.

Change of plans. We used wide paintbrushes to apply the paint to our plates.

I told the students to write their name on the lower right corner of their paper. They were also to number the print. One of the special things about printmaking, I explained, was once you have a plate, you can print it over and over and over and over and over again!

They were to leave their paper at their table, take their plate to the "inking" table, paint on one hue, take their plate back to their table, place it face up and put the paper down on top. We found it worked better to press the paper into the plate, rubbing our fingers all over the paper to press it into the plate, then trying to stamp the plate down onto paper.

The results were certainly mixed!

Here's one print that turned out great! I let the students switch their paint color, so this student has a little left over yellow mixing into his red print. I think it looks all the more charming for the yellow.


The first day of printing was just before parent/teacher conferences. I took some of the prints from each student and put them up on a bulletin board in the elementary building. Here's a shot of three different prints. The middle print is from the same plate as above. The other two prints are also quite successful for 7 and 8 year olds!


I decided to do a second class of printing. This class started with a mini-critique of the single-hue prints. We looked at some examples of prints and discussed which leaves were easy to see and which leaves were hidden. Looking at the plates, we talked about why certain plates hid their leaves, and other made them easy to see. We then talked about what we could do to make all the leaves more visible. Since we weren't going to change the plates, I suggested we use two different colors of paint--one for the leaf and one for the background!

Interestingly, many of the plates that did well with the single-hue prints seemed less successful in two colors. The leaves were so visible in the first set of printing because of the use of positive and negative space. Most often, the leaves were white with printed vein lines. The other plates, though, had printed textures inside and outside the leaf, so everything just printed in the one color.

Now, using two colors, the first set of successful plates didn't look any better. If anything, the second color distracted from the positive/negative space. On the other hand, the plates without negative space really benefited from the second color. Everything still printed as positive space, but inside the leaf was one color, and outside another. Here's two examples of these prints.


Here's the bulletin board. I'll need to change it soon since Autumn Art doesn't seem appropriate for December!

I think for an experimental project, the results were great!

Wednesday, November 5, 2008

Afterschool Art Takes the Cake!

One fun thing about my job is afterschool art. Students sign up to stay afterschool for one hour and participate in different activities. In September and October, the session was five weeks long. A whooping 24 first, second, and third graders signed up for Monday afternoons. It was a nice treat that only 8 fourth and fifth graders signed up for Wednesdays.

For this session, I decided to do an exploratory art theme. On the first day, I told the 4th and 5th graders we would be studying verbs. The confusion was beautiful.

Was this afterschool English class?

I asked them to list verbs for making art: draw, paint, collage, print, sculpt... I explained that each week we would be exploring a different verb from this list of five.

For drawing, we did mixed media work combining colored pencils, oil pastels, crayons, markers, and other drawing media.
For painting, we learned various watercolor techniques.
For collage, they made representational and non-objective work.
For printmaking, we made styrofoam prints and monoprints.

Eventually, it was the sculpting week. I couldn't decided what material to use. Third grade made cardboard sculptures. That would be one possibility. Fifth grade was already in the middle of a wire sculpture project during their class time. Clay would be impossible.

Suddenly, it came to me. My principal told the 4th and 5th graders we could have ice cream on the last day if their artwork was A-quality. (They'd been asking about grades for afterschool art, and ice cream seems like a good grade!) Given the situation with dairy, it seemed like a great alternative would be CAKE SCULPTING!

Family Fun and Ace of Cakes became great resources. I made two round cakes, one square cake, and 6 cupcakes. I also bought two cans of white icing, Skittles, M&M's, and Fruit by the Foot in various colors.

Once again, I used the "catch them off guard" motivation tactic. I don't know the official name, but I'm sure Julia taught it to us in Early Field. I told the class we all needed to sit at one table. I asked them what types of materials are used to make sculpture. Clay, stone, metal, wire, cardboard. They listed some main ones. We wouldn't be using any of those materials. We were using something new, and before we made our sculpture, we needed to research this kind of sculpture on the Internet. At this point in time, I played some Ace of Cakes videos from FoodNetwork.com. You should have seen their faces...a lot of confusion, for one. An American girl whispered under her breath "wait, we're using cake?" For other kids, it didn't click until I carried the cakes into the art room. Yes, we were using cake!

On Ace of Cakes, they talk about using standard round and square pans, then cutting and carving into the shapes. At this point in time, we looked at some cake designs from Family Fun. I printed out instructions that consisted of cutting cakes into different sections and reassembling with icing to create pencils, panda bears, and more. Before we decided on a design, we cast our collective vote in a web poll for the best cakes on the Family Fun website. There were some inspiring designs!

Someone offered a palm tree for our design. I liked the idea. It seemed mildly challenging, but doable. The square cake would make a great tree trunk. The round cakes could be cut into palm fronds. Lastly, the cupcakes would make cute little coconuts!

We began cutting. The kids were quite hesitant, but I reassured them we could always "glue" pieces back together with icing. I scored guidelines for the cuts onto the cakes and let different students hack away (using butter knifes)! We also trimmed the cupcakes to make them more spherical.


The next step was a base coat of icing! Still, the kids were a little too delicate. It was getting mighty close to 4:00, time to go home! I found the best method to expedite the process was to slop a huge glob of icing in a section and let the kids spread it around. Each student took turns icing the tree. For time's sake, we decided the sides didn't need icing.


We had a little extra cake from the round pans and decided to make some sand for the tree. Of course, all the small trimmings had already been consumed by the crew, but these were large chunks!

After the base coat, the decorations kicked into gear! It was an all-out mad house as they quickly covered the fronds with anything green, the trunk with brown and purple items, and the sand with yellow and orange. We decided to leave the chocolate cupcake au natural because of their brown color.

Thankfully, we didn't need blue or red items. Those candies made for extra snack!


Eventually, it was time to cut the cake! We barely had enough time to give each kid some cake and send them to the bus with their treat.

Between the nibbles of cake and candy during the sculpting, and the LARGE portions of cake they took on the bus, I'm pretty sure none of the kids wanted dinner that night!

The next morning, as one fifth grade class came to art, they said "did they really decorate a cake yesterday in afterschool art?" It was true, and a few stray bits of icing and cake crumbs around the room confirmed it!

Here's the whole crew with our Palm Tree cake sculpture!


So yummy, Christopher is licking his fingers in the picture!

Sunday, November 2, 2008

Why I Love 3rd Grade

Third grade is the only grade I have yet to write about. Funny, because I love the classes. I have two third grade classes and one ESL class that is a mix of second and third. I've been doing third grade projects with them.

Our second project for the year was a sculpture piece. We spent a lot of time discussing the difference between 2D and 3D things. Alexander Calder was the artist inspiration. We looked at his stabiles and mobiles. You'd be surprised--even with 85% ESL students at our school, many of the kids were familiar with baby mobiles above cribs!

Calder took flat sheets of metal and combined them to create 3D sculptures. Obviously, we couldn't work in sheet metal. Instead, corrugated cardboard was the building material.

The project took three class periods. The first was construction. The second was construction and base coats of paint. The third was details with paint.

The idea for the project came from a project my co-op taught during my early field experience. She had more constraints on the assignment. I just let the kids go for it! Some went abstract. Others went for representation. The goals for all students were stability and utilization of space.

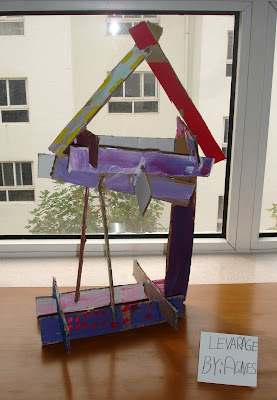
One impressive sculpture was Levarage by Agnes. First of all, the title! She's an ESL student. I'm not sure where she came up with the word "leverage." Second, she went for the open house feel. Some students were hesitant, but she jumped in. Right away, she cut her cardboard into these long strips. She then began assembling them, carefully balancing the beams to create her house.

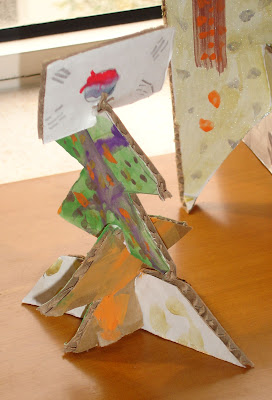
Another fun sculpture from ESL: Christmas Tree Korea! Fred made this Christmas tree. For some reason, instead of a star or an angel at the top, it has the flag of South Korea. Our school is almost 70% Korean. It's amazing where this flag shows up in art class. His tree is also partially orange. I'm not sure what that's about...apparently Asia doesn't limit Christmas to red and green.


As the weeks went on, I thought "what am I going to do with all these sculptures?" Thankfully, I had counterspace to store them while in process. At the end of the project, I asked the librarian if we could use the top of the bookcases to display our work. She obliged, and we had instant exhibition space!

The kids titled their work and labeled small cards to place next to their work.

Transporting the sculptures down two flights of stairs and up two more, from the Fine Arts building to the Elementary building, was quite a feat! Some sculptures were in need of repair by the time we reached the library.


Overall, I think it was a success!


Here are the sculptures in the library:


Our next third grade project involved drawing from observation. Once again, these kids blew me away!

I borrowed a bike from a staff member. I rearranged the room so all the tables were around the perimeter of the room except for the middle table, which held the bike. (Note to self: this was a pain! The three classes meet on three different days! Lots of rearranging of tables and lifting of the bike...)

I told the students this was a challenge. Drawing a bike is a HARD THING. I had to draw a bike in high school. They were only in third grade! Where do you even start?

Here's where I pulled out some Mona Brooks. I decided to forgo the "circle" and "dot" families (confusing for ESL students, since we're not talking about circles as defined in geometry). Instead, we focused on straight lines, angled lines, and curved lines. With each type of line, we found examples on the bike. We also did some interesting body movements. Too bad I can't effectively demonstrate those on the blog. Here's my attempt:

        Straight line: simple, arms out straight to the sides, parallel to the floor.
        Angled line: a little "robot" or "walk like an egyptian" action here. bend at all the joints.
        Curved line: ballerina bends here, trying to make your arms as curved as possible.

I tried to stress drawing what you see, not what you know. We looked at the bike from different angles. Sometimes, the wheels don't look like two big circles. Sometimes they look like rectangles. This was a challenge for some students. Some sat staring at the bike head-on, but drew the bike in profile. I told them what a lovely drawing they did, but that's what the bike looks like from the side. They should do another drawing to show me what the bike looks like from the front. We talked about squished circles, too, when the wheels were at an angle.

We began drawing with standard drawing pencils. Most of the class supply are HB. Some of the third graders had already discovered 2B and 6B among the bunch, and learned the difference. Still, basic graphite drawings. I told them to pick one part of the bike, draw it, then use lines to draw the part that connects to that, and then use lines to draw the part that connects to that, and then use lines to draw the part that connects to that.

When the kids told me they couldn't draw something, I asked them "what kind of lines do you see?" Once they told me, I said "Ok draw it."

Some students barely finished one drawing. Others did two or three. When they were finished, they moved to a new part of the room to draw the bike from a new angle.

The next week, I pulled out the ebony pencils. The richness of the line made for some interesting drawings. I stressed using the pencils in different ways--sometimes pressing lightly, sometimes pressing hard. Sometimes doing lines, sometimes filling in the shapes. Some of these drawings were gorgeous! They had the perspective down a little better, and the variety of tones were so interesting!

Below is a drawing from that week. This student, Paul, draws such energetic scenes from his imagination. His understanding of perspective and line quality shocked me! To be so imaginative and also able to draw from observation beautifully! The front handlebars of the bike are rotated to the left, so the front wheel was angled, and thus a "squished circle."


When I look through all the drawings of the bike in his sketchbook, he just gets it. He sees it and he can tell me what he sees using the pencil! I can't believe a third grader did that drawing!

The third class period was colored pencils. We talked about naturalistic and expressive use of colors (without those terms).

At the end of each class period, each student picked their best drawing for the day. We gathered together and looked at all the best drawings. Sometimes we said two positive things about each work. Other times, we looked at drawings that effectively used value or color and discussed how they did that.

The fourth week started by looking through the sketchbooks. Each student picked their best drawing. Using that as a guide, they found the spot in the room where they could draw the same view of the bike. Each student got a larger piece of nice drawing paper (compared to the A4 copy paper of their sketchbooks). They did a similiar drawing, using the previous drawing as their guide. All class period was spent on this one drawing. As a final piece, these drawings were displayed around school.

Another reason why I love third grade: I stopped by a staff member's house last Friday. His son is in third grade. The son came up to me and said "I've been drawing my bike." See, in China, we keep bikes in our apartments. His is in his living room, and his mom confirmed that he's been drawing it on a regular basis!

Wednesday, September 10, 2008

Painting!

This morning, my principal asked about my work load.

Is is too much? You're teaching PreK-5th grade.

I found the question quite timely. Just last night, I told my mom that I'll never be able to teach in the States.

What are you trying to tell me? she asked.

I reassured her that these almost two months had not turned me into a life-er, as they're called. For now, I'm here, and since I'm here, my energy is focused on here. Decisions about my life after June 2010 will come later.

But this is what I was saying...

I am SO SPOILED (or spoilt, as the Brits would spell it).

Let me reiterate, if you don't remember, my "full load" involves teaching 13 classes a week. Those 13 classes, each has a class size of 7-15 students! On top of all of this, Mrs. Greene and I work with the art teaching assistant, a local Chinese woman who has been at the school for 4 years. She is in the classroom for most of my classes, providing another set of adult hands, along with helping purchase and prep materials.

Yesterday, I painted with 9 first grade students during the last period of the day. We had about 15 minutes between classes. It was just enough time for me and Mrs. Yang to set up 9 painting stations, fully equiped with water, paper towels, two paintbrushes, a 15x20 sheet of paper, and a palette with red, yellow, blue, and white paint.

Side note: My students were so excited to paint this week that one student brought paintbrushes from home! Waiting to come into the room in the hallway outside the classroom, another student commented "but she only has 7 paintbrushes!" I assured him that I had paintbrushes too, and every student would get a paintbrush, even if she didn't have enough for everyone in class...

At the end of class, I took the students to the bathroom next to my classroom to wash hands. (My classroom sink isn't classroom friendly.) When I came back to the classroom, clean-up was well underway.

Paintings were on the drying rack.
Tables were wiped down.
Water buckets were rinsed out and drying.
Palettes and brushes were collected, and she was cleaning them all in the classroom sink.

At the end of the day, I painted with an entire class of 1st graders, all class period, and did not wash out a SINGLE paintbrush.

Painting is typically a labourous undertaking for an art teacher.

It's quite easy at my school. Mrs. Yang and I, we have it covered.

I am so thankful, and my students will truly reap the rewards. They LOVE painting!


Today, I painted with 7 PreK students. It was the second week in a row of painting for them. You should see the learning! Given limited paint options (teacher-planned, of course), they make such discoveries...

Last week, each student had one cup of paint---the color of the table where they sit. Then, they worked with a friend from another table with a different primary color. I moved their seats around so we had one red-yellow pairing, one yellow-blue pairing, and one blue-red pairing. (One student was absent, so we had six students exactly.) Each group had one long sheet of paper. They took turns making dots on the paper in a line. As their classroom teacher told me, they were working on basic sequencing. Every other made a nice alternating pattern along the paper.

Next, I gave each pair a palette. Each person was supposed to put some of their color on the palette, then MIX IT TOGETHER!

Nevermind the fact that their classroom teacher had already taught them about green, orange, and purple. They even predicted what color would happen when each combination was mixed, still, actually mixing the colors on their palette...

IT WAS MAGIC.

You should have been there. There's no way to put into words the excitement of a four year old when they first mix together blue and yellow and see that it really does make green!

They were blown away. For the remainder of the class, each student painted their own 15x20 sheet of paper using their color and the color of their friend. We had trains, flowers, faces, birds, and a student who just covered the entire surface, systematically, from corner to corner, with yellow-orange paint. The great thing is, the large sized paintbrushes combined with their developing fine motor skills meant that most of the objects just looked like blobs of paint! But they were trains and flowers, faces and birds.

This week, I wanted to build on those experiences. I knew their teacher recently introduced them to the color white. This would allow for new mixing opportunities...

When the students came into class, their places were all ready except for paintbrushes. This was my attempt to stop them from painting until I gave my intro.

It didn't work. Two students just put their hands directly into the palette of white paint.

After brief encounters with paper towels, we were ready to get started.

What color is your paint today. White! And what color is your paper? White! Oh no. How is that going to work? White paint on white paper? What should we do? We need another color! Good idea! Everyone can pick ONE color to add to their palette.

Last week, we mixed colors with our friends. What will happen if we mix our color and white?

No one knew, so we needed to try it!

Another amazing moment, as students around the room found light blue, light yellow, and pink. Gasps, literally gasps, and huge smiles.

So adding white makes a color lighter...

And pink, as I explained, is a special name we use to talk about light red.

My intention was to have them paint with those two colors---white and the color they chose. One student requested another color. I decided two primaries and white would be fine. There's no chance of all-brown paintings with just two primaries.

I let each student pick a second primary color. The color mixing that ensued was so fun! Look for some PreK paintings to be posted in the future...


I was thinking tonight, at this point in time, seven years ago, I wanted to be a preschool teacher. I was just starting high school and wasn't serious about art. I didn't sign up for Art 1, only the ceramics elective.

I still love teaching PreK. I am so glad their class got added to my workload. But I love the other grades too. Surprisingly, I even loved my high schoolers at Fleetwood and my middleschool and highschoolers at Stoke Damerel. I hope to have more interaction with secondary students at our school as time goes on and the program develops.

I love kids of all ages, and I love teaching. But teaching art is definitely a blast! I wouldn't want to trade it for any other subject...just look at the faces of my first graders as they line up outside of the art room, eager to come in and start painting!

I see the other first grade class tomorrow afternoon. I can't wait to see their excitement!

Sunday, August 31, 2008

One Full Week!

This week was the first FULL WEEK with students.

Five student days.

I'd like to say it was nothing, didn't wear me out or anything.

In all honesty, I was so excited for Friday to finally come! And then, just in time for the weekend, some sort of bug knocked me out COMPLETELY on Saturday. All day Saturday...I'll spare you the details.

Thankfully, I started feeling better this morning, so I had all day to sleep, start to eat, and regain my strength for ANOTHER FIVE DAY WEEK! But I did miss having a weekend, where I could do things for myself...

Check out the picture below! I came in last Monday to find a BRAND NEW CEILING AND LIGHTING in my art room. I was told that they would be putting in new lights, but I didn't realize the lights and drop ceiling would come at the same time. I don't have much of an opinion about the ceiling. It looks nice, and that extra 2 or 3 feet would never have been used. This is supposed to help with heating and cooling costs, and now I have better lighting!


Probably the biggest news for this week is that I'm teaching the Pre-K class! Once a week, for 30 minutes. It's a small little class of 7 students. One girl cried hysterically about coming to art class. Thankfully, one of the classroom teachers stayed and sat with her. About 5 or 10 minutes into class, she finally stopped crying.

It's a fun class, especially since I have four of my colleagues' children as students. Two of the boys' dads work in the secondary building. One little girl's dad is a music teacher and the head of fine arts. And another little boy, his dad is my principal, the principal of the elementary school.

Pre-K was learning about colors in their class. We practiced our cutting skills by playing "HIDE AND SEEK" and finding the colors that were hiding in magazines.

The yellow table cut out yellow items.
The red table cut out red items.
The blue table cut out blue items.

Then a teacher helped each table glue their bits onto construction paper. The classroom teacher that stayed helped the yellow table, my TA helped the red table, and I helped the blue table.

My principal's son was sitting at the blue table. At one point in time, I thought he said "I like you." Then I realized, he was probably saying "I like blue" since he was sitting at the blue table and cutting out blue items. A few minutes later, I was helping him cut out some more items. This time, it was clear as day. "I like you." Yes, this little four year old boy likes me.

He also likes my scissors. They spring open to help young children with their fine motor skills...

He saw me two days later, on Friday, pointed at me and told the person he was with "I like her."


Here are the finished Olympic bulletin boards---designed and created by the 5th grade classes.

I'm so impressed.

Nearly everything is their own creation. I stapled the items on the board, with their direction. I also created the flag of South Africa on the first bulletin board. (It's fairly complicated, and the students were struggling, but since our secondary principal is from South Africa, I thought I'd help them out!)

I love the way the first bulletin board combined the Olympic rings and the word "Olympics." Genius.

And check out the finished torches on the second bulletin board...those torches are the result of rulers, protractors, "paper and pencil" math calculations, mental math, and research at home! (One boy from the group printed out color images of the torches at home and brought them in for the second class so they could get all the details perfect.)


Lastly, some finished hand designs from the 2nd graders and the 2nd/3rd grade ESL class.


This girl really impressed me. The front of her book is beautiful. She finished early, so she began designing the back. I didn't ask the students to think about the arrangement of hands on the front cover, but merely to overlap the hands to cover the entire page. She took this to the next level when she designed her back cover. It's things like this back cover that make you smile and realize your students are learning, applying their understanding independently, taking risks, and finding success!


I read this passage in The Art of Teaching Art to Children on Friday night:

Sometimes the art room gets really quiet. It's the tip-0ff that the kids are deeply involved. I haven't asked the children to be quiet. They are simply expressing their involvement in the work by a high level of intensity, combined with a deep focus. They are immersed in the art materials and in themselves.

I started tearing up. Already, there have been many quiet classes in the art room. I love to facilitate this type of involvement in art, in the process of creation!


Sometime, I need to write about 3rd grade. They're awesome! The discussions we have about art, their increasing drawing skills, and the crazy portraits they're drawing of their classmates...it's a great time!

Thursday, August 21, 2008

An Infestation of Ladybugs!


Today I made my first mistake as a teacher.

Okay, it probably wasn't my first mistake, but it is noteworthy.

I was teaching the other batch of first graders, so I was doing the same lesson on favorite colors (see first day post). Here was the mistake: The students had already selected the crayon that was their favorite color, but I didn't pay attention to the colors they had selected. Instead, I randomly chose red as my example. I explained that ladybugs are red, but to draw a ladybug, you would also need to use the black crayon. Then I drew a simple picture of a ladybug on the whiteboard.

Last week, I deliberately chose a color that NO STUDENTS had picked. This week, I didn't notice that two of the nine children had picked red.

Guess how many ladybug pictures I ended up with?

Not two. Twice that many. FOUR.

Yes, even though only two children choose red as their favorite color, two others managed to work a ladybug into their picture. Beach scenes with ladybugs, flowers with ladybugs. It almost didn't matter what you drew, you could add a ladybug to your picture and make it better!

It is quite flattering to have so many students follow your example, but five ladybugs doesn't contribute to the goal of developing independent thinkers. Maybe we can work on that next week...

Saturday, August 16, 2008

Pictures of My Classroom!

Sorry the picture is a little bit blurry. It's a good overview of my classroom, though. There are three tables, each with six stools (red table, closest to the camera, yellow, to the left, and blue, closest to the door and easel).

There's also a supply table/teacher's desk in the corner behind the door. It's not really my desk, because my desk is in the fine arts office, right across the hall. You can see the blue sign for the office through my classroom door. My name is on the blue sign, along with the other art and music teachers.

Behind the supply desk, the words next to "ART" are the character traits for the year.

I have lots of bins of supplies, labeled with post-it notes (by the previous teacher). Working on the organization of supplies is a long term goal, especially as we purchase more supplies.

All the paintings above the shelving are from the secondary classes last year. They will probably come down and get moved to the new secondary art classroom.


(Last year was the first year at this campus, and all the art classes for both teachers were taught in this room. The secondary classroom is a work in progress, but functioning this school year. Slowly, this classroom is transforming into an elementary space as Mrs. Greene's classroom gets set up.)


Here's the front of the room. Below is a detail of the displays I made during the staff days before school started. The "Flavorful Folds" display was Miss Emily's idea! There should be a similar display in an elementary art classroom in Pennsylvania.

Beyond the traditional hot dog and hamburger folds, Miss Emily introduced me to the taco fold (square paper folded diagonally), the burrito fold (folded in thirds), and the kite fold, a variation of the taco which I decided to call the ice cream fold (keeping with the food theme).

I also spelled my name for the students, though I'm certain most will call me "Miss M."

The "Awesome Artists" wording of the rules was also Miss Emily's idea, though I'm not certain of her specifics for how to be an awesome artist. Mine are:

Awesome Artists are excited about ART
Awesome Artists do their best job
Awesome Artists treat others kindly
Awesome Artists take care of supplies
Awesome Artists follow the teacher's directions

Of course, since many of my students come from homes where English is not the primary language, I realized I needed to make sure my international students knew the word "awesome." The subtle difference when you teach at an international school...

Below is a detail of my construction paper shelves.

I love the colors!


Here are the "in-progress" sketchbook covers of the prize-winning second graders (a class of only five students, for now). They were captivated by this project! Then again, what student doesn't love tracing their hand...

This student's cover is almost finished. I think it will be stunning when he finishes the small shapes from where all his fingers overlap in the middle of the page.

Thursday, August 14, 2008

The First Day of School!

Today was the FIRST DAY OF SCHOOL!

Well, sort of...It was the first day I taught in my first classroom at my first teaching job in my first school! Yesterday (13 August 2008) was the actual first student day, but it was a half day, and the elementary students did not go to specials. Today started specials, which meant ELEMENTARY ART!

That's right, folks, after months (literally) of uncertainty, I am teaching kindergarten through 5th grade art classes.

Mrs. Greene, the other art teacher, is teaching all of the secondary courses. (Sidenote: Very unfair that her last name is a color and my last name is Melachrinos!)

The classes come once a week, 50 minutes for 2nd-5th grade and 35 minutes for kindergarten and 1st grade. With one kindergarten class, two of all the other grades, and one ESL class, I teach 12 classes a week. Yes, that is all, and it is full time. And Mrs. Greene and I share a teacher's assistant.


My job is nice.


Today, in addition to being my first day, was my "long" day. I taught four classes. Here's the run down:

5th grade--designing and working as a class to create an Olympic-themed bulletin board outside the art classroom.

4th grade--a discussion of the Fuwa (Olympic mascots) and their symbolism, followed by sketching their favorite Fuwa.

2nd grade--working on the cover of their sketchbooks. On the red cover paper, they traced their hands six times, overlapping to create lots of shapes. Each shape was outlines and filled in with crayon, covering the entire front cover.

1st grade--drawing an object using their favorite color crayon and sharing the pictures with the class. (Lesson idea complements of Miss Emily)


Some things worth mentioning, by class:

5th--the table drawing the Olympic torch debated the conical shape of the Beijing torch design. Also, they asked for a ruler, protractor, and calculator to create their exact replica twin torches for the bulletin board.

4th--clearly, there are favorite Fuwa. Of the 14 students, all chose Jingjing (Black Panda) or Huanhuan (Red Flame). No one chose Beibei (Blue Fish), Yingying (Yellow Antelope), or Nini (Green Swallow).

1st--it's one thing to know that girls mature faster than boys. It's another thing to witness is first hand in your classroom. Night and day. 1st grade provided the first discipline problem. One boy refused to color a picture. Apparently he was having a bad day right before art class.


And lastly, 2nd--they get the prize! When I was demonstrating the steps of the sketchbook covers, at the end, I showed a partially-finished examples. The class erupted in a collective gasp! Definitely the best reaction I've ever received for my artwork! And they worked so well on their own projects, quietly. You could have heard a pin drop! It was making me so uncomfortable, I tried to engage the students in conversation. They were too involved in their artwork...


I'm sure people would love to see pictures of my room. They are coming! The room is still a work in progress, but I'm quite pleased with my little home. Little being key, but with a max class size of 18, and an average class size of 12, it works!

One class tomorrow, 3rd grade!

Search This Blog

Total Pageviews


  © Blogger template Shush by Ourblogtemplates.com 2009

Back to TOP